Presented during the TopFuel 2015 conference
THE EFFECT OF STRESS BIAXIALITY ON HYDRIDE REORIENTATION THRESHOLD STRESS
M.N. CINBIZ
Department of Mechanical and Nuclear Engineering, Pennsylvania State University
University Park, PA 16802, USA
D.A. KOSS
Department of Materials Science and Engineering, Pennsylvania State University
University Park, PA 16802, USA
A.T. MOTTA
Department of Mechanical and Nuclear Engineering, and
Department of Materials Science and Engineering, Pennsylvania State University,
University Park PA, 16802, USA
ABSTRACT
During vacuum drying operations, spent fuel cladding typically can experience high internal gas pressure loading that can cause the precipitation of dissolved hydrides into a radial configuration which can degrade the mechanical properties of the cladding during dry-cask storage/transportation conditions. Because the stress state experienced by the cladding is multiaxial, this study investigates the role of stress state on hydride reorientation. Zircaloy-4 sheet test specimen configurations were designed to induce a range of multiaxial stress states in material, which was previously charged with hydrogen contents ≈180 wt. ppm. The specimens were subjected to thermo-mechanical treatments designed to form radial hydrides, and the critical stress to reorient hydrides was determined in each case by matching the stress state calculated by finite element analysis at a specific location within the specimen to the hydride microstructures at that location. The results show that the critical value of the major principal stress to initiate radial hydride precipitation decreases from 155MPa to 115MPa as the stress state changes from uniaxial tension to plane-strain tension. Thus, increasing the degree of stress biaxiality enhances radial hydride precipitation, and the effect of stress state should be considered when the assessing the probability of hydride reorientation during drying-operation.
1. Introduction
As a result of waterside corrosion reactions hydrogen is picked up by the nuclear fuel cladding during operation in light water reactors. While up to 120 wt. ppm of hydrogen can typically be in solution during operation, when the fuel is removed from the reactor nearly all of the hydrogen precipitates as hydride particles. The precipitated hydride particles can degrade the mechanical properties of the cladding material[1]. In particular, the potential for hydride embrittlement of the cladding tubes increases drastically if the hydride platelets are reoriented from their normal circumferential orientation onto the radial direction of the cladding as “radial” hydrides [2, 3]. Hydride reorientation can occur as a result of heat treatments during the vacuum drying process in which the cladding temperature can reach up to 400°C, causing the hydrides to partially or completely dissolve. During subsequent cool-down, the hydrogen in solid solution can re-precipitate as radial hydride platelets if the hoop stress caused by the internal pressure of the gaseous fission products and fill gases exceeds the threshold stress level for formation of radial hydrides [4]. Hydride reorientation has been studied for either internally pressurized tubes or uniaxial tension testing of flattened tubes with differing thermo-mechanical histories and hydrogen contents [2-8].
The internal pressure within the cladding tube during drying results in a multi-axial stress state within the cladding tube characterized by an axial stress component (minor principal stress) in addition to the tensile hoop stress (major principal stress). There is also the possibility that fuel-cladding interaction may cause an even more complex stress state on a local basis. The influence of a multi-axial stress state on hydride reorientation in cladding material has not been investigated in a systematic manner to date. In this study, the role of stress state on hydride reorientation is assessed over a range of stress states induced by specially designed Zircaloy-4 specimens that are subjected to specially designed thermo-mechanical treatments.
2. Experimental and computational procedures
The Zircaloy-4 sheet material in this study was furnished by Teledyne Wah-Chang in the cold-worked stress-relieved condition with a nominal thickness of 0.67 mm, and exhibited a similar crystallographic texture and tensile properties to those of cladding tube material [9]. The experimental procedure for introducing hydrogen was developed by combining the stress-relief anneal with a hydrogen charging treatment. In this procedure, prior to hydrogen charging, the native oxide layer from the surface of the material was first removed using an acid solution, and the specimen was then coated with a 20-nm thick nickel layer to allow hydrogen ingress. A controlled amount of hydrogen-argon gas mixture (12.5% H2 and 87.5% Ar) was subsequently introduced into the chamber (initially at a pressure of less than 13.3x10⁻⁶ Pa) containing the cold-worked specimen at 500ºC. The temperature of the chamber was maintained for 2 hours to simultaneously induce stress relief and to homogenize the absorbed hydrogen through the sample thickness; the specimens were then furnace-cooled. The hydrogen concentration of each sample was determined by hot vacuum extraction. The specimens studied had hydrogen content of approx. 180 wt. ppm.
The as-hydrided microstructure consists of “in-plane” hydride platelets parallel to the sheet surface, analogous to the circumferential hydrides in Zircaloy-4 cladding tube. In order to re-orient the hydride platelets from their normal in-plane orientation into the through-thickness (“radial”) orientation, the specimens were subjected to a thermo-mechanical treatment that consisted of a 2-cycle procedure with an initial cycle consisting of heating at a rate of 5ºC up to 450°C (sufficient to dissolve 180 wt. ppm in Zircaloy-4 [10]), holding at 450ºC for 1hr, and subsequent cooling at a rate of 1˚C/min to 150°C.
Because previous studies have shown that hydride are still in solid solution at 400ºC for hydrogen content of 180wt.ppm[8, 10]), To simulate a possible vacuum drying process[11], when the temperature reached 400ºC during cooling, a constant load was applied to the sample which was maintained until a temperature of 150ºC was reached. This thermo-mechanical cycle ensured that the hydrides were completely dissolved[8, 10] at the maximum temperature for normal operating conditions[11]. The hydride microstructure was examined before and after thermo-mechanical treatments by grinding the samples with successively finer silicon carbide paper followed by etching in an acid solution consisting of 1 part of HF, 10 parts of HNO3, and 10 parts of H2O to reveal the hydrides.
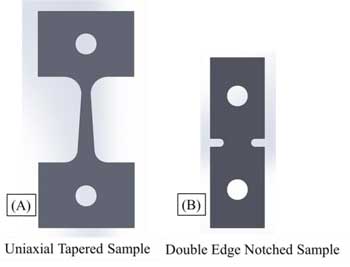
Figure 1 shows the two types of tensile specimens used in this study. Tapered uniaxial tension specimens (Fig. 1 (a)) were machined from Zircaloy-4 sheet with their stress axis oriented in the long-transverse direction of the sheet, which corresponds to the hoop direction of the cladding tube. The taper within the gauge section caused the tensile stress to vary by approximately 45% over the length (13.06 mm) of the gauge section, which had a maximum width of 3.75mm. The length to width ratio of the gauge section exceeded the four-to-one ratio recommended by ASTM for such specimens. [12]
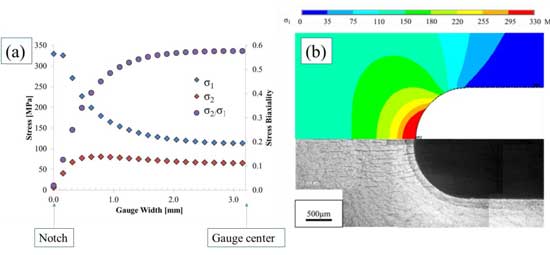
The other type of sample was the double-edge notched “Penn State” flat plane-strain specimen, which imposes a multiaxial stress state on the sample [13]; see Figure 1b. To achieve multiaxial stress state conditions within the tests specimens, Zircaloy-4 sheet with a width of 12.7 mm and length of 40 mm were machined to have a notch opening of 2 mm and a notch radius of 1 mm. This specimen configuration creates a range of multiaxial stress states that can be characterized by the stress biaxiality ratio σ2/σ1, where σ1 is the major principal stress and σ2 is the minor principal stress. The small thickness of the sheet creates a plane-stress condition such that the third principal stress σ3= 0. As shown by finite element analysis a characteristic of the double edge notch specimen is that in the elastic regime, it creates biaxial stress states that vary from σ2/σ1= 0.57 at the center of the gauge section to σ2/σ1= 0 near the notch, as seen in Figure 2. With this knowledge, the effect of stress biaxiality on the radial hydride precipitation can be studied by correlating the hydride microstructure with the local stress state at a given location. In this study, the loads applied to the specimens were in the elastic range for the locations where hydride reorientation was documented.

Figure 1. (a) Tapered uniaxial tension specimen and (b) double-edge notched specimen.
The spatial variation of stresses in the double edge notch specimen requires the use of finite element analysis as shown in Figure 2(a) to obtain the local stress values. The threshold stresses for hydride reorientation in double edge notch tension samples were obtained by matching the finite element results and the metallographic images at the same location for the onset of hydride reorientation. The major and minor principal stresses (σ1 and σ2, respectively) were calculated by both two-dimensional and three-dimensional finite element analyses at a known applied load, using the finite element software ANSYS. The Zircaloy-4 sheet material was assumed to have isotropic material properties, and the yield stress at 400ºC of Zircaloy-4 sheet (σy = 300 MPa) was determined by previous studies performed on the same material [8, 9] and confirmed by experiment in the present study. The computed stresses and the stress biaxiality ratio (σ1/σ2) were mapped onto the hydride microstructures in the metallographic images as shown in Figure 2(b). It is important to recognize that both the maximum principal stress σ1 and the stress biaxiality ratio(σ1/σ2)) vary with location within the double edge notch specimen; this feature enables the correlation of a range of stress states with hydride orientations within such a specimen.

Figure 2. (a) The principal stress and stress biaxiality distribution from notch to center of gauge section; note that σ1/σ2 = 0.57 at the center of the section and σ1/σ2= 0 near the notch. (b) An example of map of the major principal stress with reference to the hydride microstructure.
The threshold stresses were determined to be those stresses calculated at the location where the hydrides are observed to transition from circumferential to radial hydrides. For through-thickness (T-N plane) micrographs, the onset of hydride reorientation was defined as a radial hydride fraction of approximately 0.05 where the radial hydride percentage was estimated by evaluating the orientation of hydrides present in 200x200μm regions using the following relation:

where RHF is the radial hydride fraction, Lri is the length of the ith radial hydride oriented between 45-90° to the transverse direction, and Lci is the length of the ith circumferential/in-plane hydride oriented between 0-45° to the transverse direction.
The “Normal” plane (L-T) micrographs (in which the “face” of the sheet specimen is viewed) identified the locations within the double-edge notched specimen in which the onset of radial hydride formation occurred. The spatial locations of these transition regions were then coupled with the FEA-predicted stress states in these regions; the predicted stress components were based on elements consisting of nine nodes. This procedure enabled the determination of the effect of stress state on hydride reorientation over a range of stress states within each individual specimen.
3. Results and discussion
Both extrinsic and intrinsic parameters affect radial hydride precipitation. Extrinsic parameters include the characteristics of the heating and cooling cycles, the applied stress, and the global stress state of the cladding material. The intrinsic parameters include grain size and orientation, crystallographic texture, degree of cold work, hydrogen content, and initial hydride microstructure[5]. This study focuses on the effect of the global or far-field stress state on hydride reorientation, and more specifically on the threshold stress. In this study, the threshold stress for hydride reorientation in tapered tensile specimens (uniaxial tension) is contrasted to that occurring within double edge notch samples (multi-axial tension).
Figure 3 shows the hydride microstructure in uniaxial tension (σ2/σ1=0) for a tapered tensile specimen containing 180 wt. ppm hydrogen and subjected to the 2-cycle heating-cooling treatment described earlier. The hydrides are observed to transition from in-plane hydrides to radial hydrides at an applied tensile stress of about 155MPa. A high degree of hydride reorientation is achieved above 177MPa, whereas, the radial hydride fraction is equal to zero at stress levels below 147MPa, where only in-plane hydrides are observed in the microstructure. An analysis of this specimen and other similar samples indicates that for the Zircaloy-4 material used in this study the threshold stress to initiate radial hydride precipitation under a uniaxial tension stress state is 155 ± 10MPa.

Figure 3. The hydride microstructure of a tapered uniaxial tension sample after the 2-cycle thermo-mechanical treatment. The threshold stress for hydride reorientation is approximately 155MPa. The image is a through-thickness view of the microstructure.
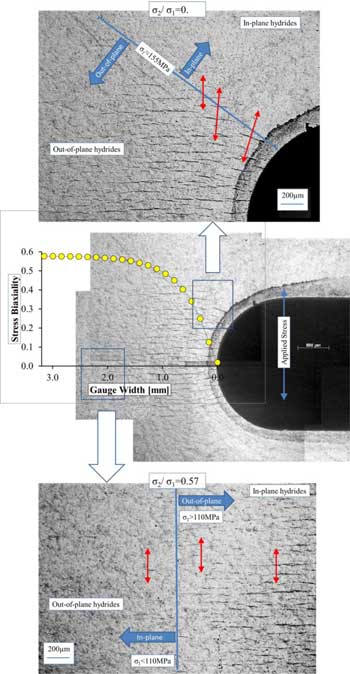
The hydride reorientation behavior under multiaxial stress states (σ2/σ1>0) was examined by matching the locations of the metallographic images and finite element analysis derived from the double edge notched specimens. Figure 4 depicts both the resulting hydride microstructure after a hydride reorientation test within a double-edge notch tension sample and the stress biaxiality ratio σ2/σ1present during the test at the center plane of the sample and plotted from the center of the specimen to the notch tip. The hydride microstructure in the Figure 4 is that viewed on the “normal” plane which contains both the transverse and rolling directions of the sheet specimen. The “in-plane” hydrides in Figure 4 are oriented parallel to the plane of view, and therefore, they are not observable in the micrograph. However, the “radial” hydrides which are perpendicular to the normal plane of the sample (or parallel to the normal direction) and can be clearly seen.
By examining specimens subjected to a range of applied loads it was possible to assess the locations for the onset of hydride reorientation. As shown in Figure 4, the location within the double-edge notch specimen dictates the local stress state such that the stress biaxiality at the notch is equal to zero (uniaxial tension), but it increases rapidly with distance from the notch such that σ2/σ1=0.57 near the center of the gauge section under the elastic conditions for this analysis. We should note that at other locations near the notch (above or below the minimum width section) the state of stress is also near uniaxial tension, i.e. σ2/σ1≈0. Thus, a range of stress states can be found at various locations within the specimen gauge section. In the present study, the threshold stress for hydride reorientation was determined for a range of stress biaxiality ratios by identifying the location where the onset of radial hydrides occurred and calculating the corresponding stress state at that location for the given load.

Figure 4. (a)The radial hydride microstructure and stress biaxiality ratio (σ2/σ1) across the gauge section of a double edge notch tensile sample. At the applied stress in this test, radial hydrides are visible in the uniaxial tensile region near notch where the local value of the maximum principal stress exceeds 155MPa (a-1). At stress biaxiality ratio of 0.57, the transition from in-plane to out-of-plane hydrides occurs at maximum principal stress of 110MPa (a-2). The red arrows show the orientation of major principal stress direction at those locations.
Careful analysis of various tests conducted in specimens subjected to a range of applied loads and showing data such as shown in Figure 5 revealed an effect of stress biaxiality on the threshold stress required to initiate radial hydride precipitation. Specifically for a given principal stress, while radial hydrides are observed in regions subject to biaxial tension (σ2/σ1>0), other regions of the specimen experiencing uniaxial tension (σ2/σ1≈0) show no radial hydrides. Consistent with data from uniaxial tension specimens (see Figure 3), an average threshold stress of 155 ± 10MPa is also found at the locations in double-edge notch specimens where there is a uniaxial stress state.
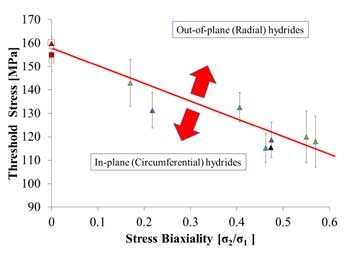
Figure 5 shows the threshold stress variation as a function of stress biaxiality. Three tapered uniaxial tension and five double-edge notched samples, all with approx. 180 wt. ppm. H, were used. For the tapered uniaxial samples, 3-5 measurements from through-thickness micrographs were taken at locations where in-plane to out-of-plane transition occurs. For double edge notched samples, 10 measurements were taken from through-thickness micrographs and 6-10 measurements were taken from “normal” view micrographs.
Figure 5 indicates that the threshold stress to initiate the radial hydride precipitation decreases as the stress biaxiality increases. From the 155MPa-value in uniaxial tension, the threshold stress decreases to 115 ± 7MPa for a stress biaxiality of σ2/σ1 = 0.5, which corresponds to that present in an internally pressurized tube. These results show that radial hydride precipitation is enhanced by multiaxial stress states such that radial hydrides precipitate at lower maximum principal stresses when a minor principal tensile stress is present. Such considerations should be taken into account when evaluating the likelihood of radial hydride re-precipitation during preparation for dry storage as the stress state in that case should be closer to plane-strain biaxial than uniaxial.[14]

Figure 5. The threshold stress (major principal stress) for the onset of radial hydride formation as a function of stress biaxiality. The specimens contained ≈180 wt. ppm H and were subjected to the described 2-cycle thermo-mechanical treatment described in the text. Each data point is the average of 3 to 5 measurements. Different colors indicate different tests.
Given that this research was conducted on unirradiated hydrided material, it is legitimate to ask whether the results obtained (in particular the sensitivity of the critical stress for hydride reorientation to stress state) are also valid for irradiated material. On the one hand several researchers have demonstrated that hydride reorientation occurs in irradiated material. [15,16] Daum and co-workers have indeed shown that the critical stress for hydride reorientation is the same whether irradiated or unirradiated hydrided material is tested.[17] On the other hand the mechanical properties of irradiated material have been changed because of radiation damage, the presence of irradiation induced defects can provide nucleation sites and the hydride distribution is considerably different because of the temperature gradients present under irradiation. However, because the stress state likely to be prevalent during drying operations of irradiated spent fuel is likely to be between plane strain and equibiaxial tension depending on the degree of bonding between the fuel and the cladding, it would be advisable to investigate the process of hydride reorientation under higher degrees of stress biaxiality.
4. Conclusions
The effect of the far-field stress state on the threshold stress for hydride reorientation was systematically investigated in Zircaloy-4 containing 180 wt. ppm of hydrogen and subjected to a 2-cycle thermo-mechanical treatment. The analysis of hydride microstructures in both tapered uniaxial and double-edge notch tensile specimens show that the threshold stress to initiate radial hydride precipitation decreases with increasing stress biaxiality ratio. Specifically, the threshold stress decreases from ≈155 to ≈115MPa as stress biaxiality (σ2/σ1) increases from 0 (uniaxial tension) to 0.5 (characteristic of internally pressurized cladding).
Acknowledgments
This research was funded by the Nuclear Regulatory Commission, under the supervision of Harold Scott. The research for this publication was supported by the Pennsylvania State University Materials Research Institute Nano Fabrication Network and the National Science Foundation Cooperative Agreement No. 0335765, National Nanotechnology Infrastructure Network with Cornell University. Use of the Advanced Photon Source is supported by the U.S. Department of Energy, Office of Basic Energy Sciences under Contract No. DE-AC02-06CH11357. The authors thank Jon Almer and Jun-Sang Park at APS for their help in running the experiments.
5. References
-
R. S. Daum, S. Majumdar, Y. Y. Liu, and M. C. Billone, Radial-hydride embrittlement of high-burnup Zircaloy-4 fuel cladding. Journal of Nuclear Science and Technology, 2006, vol. 43, pp. 1054-1067
-
Billone, M.C., T.A. Burtseva, and R.E. Einziger, Ductile-to-brittle transition temperature for high-burnup cladding alloys exposed to simulated drying-storage conditions. Journal of Nuclear Materials, 2013. 433(1–3): p. 431-448
-
Aomi, M., et al., Evaluation of Hydride Reorientation Behavior and Mechanical Properties for High-Burnup Fuel-Cladding Tubes in Interim Dry Storage. Journal of ASTM International, 2008. 5(9): p. Paper ID JAI101262.
-
Louthan Jr, M.R. and R.P. Marshall, Control of hydride orientation in Zircaloy. Journal of Nuclear Materials, 1963. 9(2): p. 170-184.
-
Kearns, J.J. and C.R. Woods, Effect of texture, grain size, and cold work on the precipitation of oriented hydrides in Zircaloy tubing and plate. Journal of Nuclear Materials, 1966. 20(3): p. 241-261.
-
Ells, C.E., The stress orientation of hydride in zirconium alloys. Journal of Nuclear Materials, 1970. 35: p. 306-315.
-
Chu, H.C., S.K. Wu, and R.C. Kuo, Hydride reorientation in Zircaloy-4 cladding. Journal of Nuclear Materials, 2008. 373(1-3): p. 319-327.
-
Colas, K.B., A.T. Motta, J.D. Almer, M.R. Daymond, M.Kerr,A.D Banchik, P.Vizcaino, and J.R. Santisteban, In situ study of hydride precipitation kinetics and re-orientation in Zircaloy using synchrotron radiation. Acta Materialia, 2010. 58(20): p. 6575-6583.
-
Raynaud, P.A., D.A. Koss, and A.T. Motta, Crack growth in the through-thickness direction of hydrided thin-wall Zircaloy sheet. Journal of Nuclear Materials, 2011. 420(1-3): p. 69-82.
-
McMinn, A., E.C. Darby, J.S. Schofield, Zirc. in the Nuc. Ind.: 12th Int. Symp., ASTM STP 1354, 2000, pp. 173–195
-
Interim Staff Guidance - 11, Rev. 3, 2003,Cladding considerations for the transportation and storage of spent fuel, U. S. Nuclear Regulatory Commission, Spent Fuel Project Office. 2003.
-
ASTM, 2001, Standard Methods for Tension Testing of Metallic Materials, ASTM E8-00b, Annual Book of ASTM Standards, vol. 03.01, ASTM, West Conshohocken, PA, 2001, p. 56
-
Link, T.M., D.A. Koss, and A.T. Motta, Failure of Zircaloy Cladding under transverse plane-strain deformation. Nuclear Engineering and Design, 1998. 186: p. 379-394.
-
Desquines, J., D. A., Koss, A. T., Motta, B., Cazalis, and M., Petit, The issue of stress state during mechanical tests to assess cladding performance during a reactivity-initiated accident (RIA). Journal of Nuclear Materials, 2011. 412(2): p. 250-267.
-
Aomi, M., Baba, T., Miyashita, T., Kamimura, K., Yasuda, T., Shinohara, Y., et al., "Evaluation of Hydride Reorientation Behavior and Mechanical Properties for High-Burnup Fuel-Cladding Tubes in Interim Dry Storage," Journal of ASTM International, vol. 5, p. Paper ID JAI101262, 2008.
-
Chung, H. M., R. S., Daum, J. M., Hiller, and M. C., Billone, "Characteristics of hydride precipitation and reorientation in spent-fuel cladding," Zirconium in the Nuclear Industry: Thirteenth International Symposium, ASTM STP 1423, pp. 561-582, 2002.
-
Daum, R. S., S., Majumdar, Y. Y., Liu, M. C., Billone, (2006). "Radial-hydride embrittlement of high-burnup Zircaloy-4 fuel cladding." Journal of Nuclear Science and Technology 43(9): 1054-1067.
|

